Friday, December 29, 2023

VirtualHost の設定(複数バーチャル・ホスト)

小ネタですが、サブドメインなど複数バーチャル・ホストを設定したときのメモ

/etc/httpd/conf.d/vhost.conf 内、下記の記述があるので、ServerName をサブドメイン(もしくは別ドメイン)に変更した <VirtualHost *:80> から </VirtualHost> までを丸ごとコピー&ペーストして、vhost.conf に追加(オリジナルのドメインの記述はそのまま):

<VirtualHost *:80>

  # REQUIRED. Set this to the host/domain/subdomain that
  # you want this VirtualHost record to handle.

  ServerName ほげほげ.com

  # Optional. You can specify additional host names that
  # serve up the same site. This can be top-level, domains,
  # sub-domains, and can even use wildcard subdomains such
  # as *.yourdomain.com - just separate each host name
  # with a single space.

  #ServerAlias ほげほげ.com

  # REQUIRED. Set this to the directory you want to use for
  # this vhost site's files.

  DocumentRoot /var/www/html/ほげほげ

  # Optional. Uncomment this and set it to your admin email
  # address, if you have one. If there is a server error,
  # this is the address that Apache will show to users.

  ServerAdmin admin@ほげほげ.com

  # Optional. Uncomment this if you want to specify
  # a different error log file than the default. You will
  # need to create the error file first.

  #ErrorLog /var/www/vhosts/logs/error_log

  # REQUIRED. Let's make sure that .htaccess files work on 
  # this site. Don't forget to change the file path to
  # match your DocumentRoot setting above.
  
  <Directory /var/www/html>
    AllowOverride All
  </Directory>

</VirtualHost>

Apache を再起動して設定を反映:

 sudo systemctl restart httpd 

DocumentRoot は別ディレクトリに作成して、アクセス権を設定(参照

SSL は追加したドメイン(またはサブドメイン)ごとに新規に証明書を生成しなくてはいけないが(参照今回はスキップ。

Thursday, December 28, 2023

WordPress の設定

インストールができましたので(参照)、実際にブログをポストしてみたいと思います。

WordPress の設定:

ターミナルで接続して、直接、wp-config-sample.php を開きデータベース情報を記入し wp-config.php として保存することもできますが、今回はブラウザーから設定してみます。

MySQL をインストール時に作成したアカウント(実際は WordPress 用アカウントを作成することが推奨ですが練習なのでマスターアカウントを使ってます)と DB 名を入力:

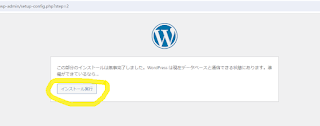
無事 DB に接続できましたのでインストール開始:


WordPress を使ってみる:

アカウントの設定:

アカウントが作成されました:

作成されたアカウントでログインしてみます:

無事ログインできました:

左ペインの [外観] からテーマを選択(もしくは追加):
*今回はテストなのでディフォルトのまま。

[新規投稿を追加] からポストしてみます。

テスト投稿を [公開]:

無事公開されました(SSL も有効です):


Wednesday, December 27, 2023

WordPress のインストール

PHP のインストール:

Amazon Linux 2023 では amazon-linux-extrasが入ってないので、AL2023のディストリビューションに同梱されているパッケージ(rpm)を確認しつつ構築していくことになります。

 dnf list | grep php 

PHP のリストを表示:

よくわからないが 8.1 / 8.2 がある。下記コマンドでインストール:
sudo dnf install -y php-fpm php-mysqli php-json php php-devel 

インストールされました:


WordPress のインストール:

/tmp ディレクトリに移動してパッケージをダウンロード:

 sudo wget http://ja.wordpress.org/latest-ja.tar.gz 

解凍:

tar xvzf latest-ja.tar.gz

解凍したファイル全てを /var/www/html へ移動:

 sudo mv * /var/www/html 

サイトにアクセスしてみたところ下記が表示されましたのでインストールは完了:


Tuesday, December 26, 2023

AWS RDS 構築メモ(無料枠利用)

RDS 構築:

AWS のマネージド DB サービスの一つ RDS を試してみました(無料枠利用)。
Database から RDS 選択: 

[Create database] で DB を作成:

Easy でもいいですが、今回は [Standard create] で DB は MySQL を選択

MySQL のバージョンは 5.7 系の最新版。今回は練習ですので Free Tier を選択:

無料枠利用ですので一番小さいインスタンスに容量:

DB の名前とマスターユーザーの名前とパスワード:
(無料枠なので durability のところは single DB しか選べない)

Connectivity

EC2 インスタンスとの接続ですがサブネットを自動で設定してくれるみたいです。EC2 インスタンスからしかアクセスしないので(セキュリティ的にも当然)パブリックアクセスは No で DB インスタンスを作成:

設定が終わりましたら [Create database] で作成:

Creating... (2, 3 分かかりました):

RDB インスタンスが無事作成されました:


ポート開放:

作成した RDS インスタンスはパブリックに公開してないので、EC2 インスタンス(EC2 インスタンス作成手順はこちらを参照)からアクセスしますが、ポートを開ける必要がありますので EC2 セキュリティグループを編集:

ポート3306 を追加:


EC2 から RDS に接続:

AWSでは RDS MySQL への接続には MySQLと互換性がある MariaDB を使用することをオフィシャルには案内(参照)しているのですが、なんとなく MySQL に接続するなら MySQL CLI クライアントを使いたくて下記のようにインストールしました。

 dnf -y localinstall  https://dev.mysql.com/get/mysql80-community-release-el9-1.noarch.rpm 

 dnf -y install mysql mysql-community-client 

クライアントがインストールできたら下記コマンドで RDS に接続してみます。 

 mysql -h ほげほげ.rds.amazonaws.com -P 3306 -u admin -p 

無事に接続できました(正しく MySQL> プロンプトが返ってきてます)

テスト・クエリーを流してみても動作していることが確認できました:


Monday, December 25, 2023

アクセス権設定とファイル・アップロード

ec2-user を apache グループに追加:

作成したインスタンス(参照)にファイルをアップロードしようとしたらアクセス権エラーがでたので/var/www/html ディレクトリとファイルのアクセス権の変更しました。
ec2-user ユーザーが所属しているグループを確認  groups 
(下記は root のグループを表示)

存在するグループを表示  cat /etc/group 

読み方がわかりませんでしたが下記だそうです。

グループ名:x か暗号化されたパスワード:グループ ID :サブグループとして所属ユーザー

ec2-user を apache グループに追加  sudo usermod -a -G apache ec2-user 


/var/www ディレクトリとファイルのアクセス権の変更:

/var/www ディレクトリとファイルの所有者・グループは root なので:

所有者・グループを ec2-user に変更します。

 sudo chown -R ec2-user:apache /var/www 

/var/www ディレクトリとファイルの所有者・グループが ec2-user に変更されました。


/var/www 以下、フォルダとファイルのパーミッションの設定:

現在の設定は 755:

グループにも全権を与えます(2775):

 sudo chmod 2775 /var/www 

apache グループにも権限が追加されました。ちなみに 2775 の 2 はスティッキービット(そのファイル・ディレクトリの所属グループの権限で操作可能)。

ファイルアップロード:

これでローカルから SCP クライアントを使って直接ファイルのアップロードが可能に:


Friday, December 22, 2023

Apache と mod_ssl のインストール(Let’s Encrypt で無料 SSL 化)

Apache と mod_ssl のインストール:

作成したインスタンスにターミナルで接続(参照)。Super User になって  sudo su 

真っ新なインスタンスですので、まずアップデートをします(最近は yum update じゃないのね。。。)

 sudo dnf update -y 

Apache と mod_ssl をインストール:

 sudo dnf install httpd mod_ssl 

Apache を起動:

 sudo systemctl start httpd 

有効化:

 sudo systemctl enable httpd 

起動しているかステイタスを確認:

 sudo systemctl status httpd 

念のためブラウザーからグローバルIPで確認:

DNS レコード:

証明書作成時に vhost.conf のドメインみているようで IP と一致しないからかエラーになったので、証明書作成前にグローバル IP を DNS レコードに設定しておいたほうが良いみたいです。

Obtaining the SSL Certificate:

In order to secure the website, you need an SSL certificate. 
I used Let’s Encrypt (https://letsencrypt.org/), which provides free SSL certificates.

Install Certbot: Certbot is a tool provided by Let’s Encrypt to easily obtain SSL certificates.

First, install PIP:

 sudo dnf install python3 augeas-libs 

Set up a virtual environment:

 sudo python3 -m venv /opt/certbot/ 

 sudo /opt/certbot/bin/pip install --upgrade pip 

Install Certbot on Apache:

 sudo /opt/certbot/bin/pip install certbot certbot-apache 

 sudo ln -s /opt/certbot/bin/certbot /usr/bin/certbot 

/etc/httpd/conf.d/vhost.conf を作成(下記をコピー):

<VirtualHost *:80>

  # REQUIRED. Set this to the host/domain/subdomain that
  # you want this VirtualHost record to handle.

  ServerName ほげほげ.com

  # Optional. You can specify additional host names that
  # serve up the same site. This can be top-level, domains,
  # sub-domains, and can even use wildcard subdomains such
  # as *.yourdomain.com - just separate each host name
  # with a single space.

  #ServerAlias ほげほげ.com

  # REQUIRED. Set this to the directory you want to use for
  # this vhost site's files.

  DocumentRoot /var/www/html

  # Optional. Uncomment this and set it to your admin email
  # address, if you have one. If there is a server error,
  # this is the address that Apache will show to users.

  ServerAdmin admin@ほげほげ.com

  # Optional. Uncomment this if you want to specify
  # a different error log file than the default. You will
  # need to create the error file first.

  #ErrorLog /var/www/vhosts/logs/error_log

  # REQUIRED. Let's make sure that .htaccess files work on 
  # this site. Don't forget to change the file path to
  # match your DocumentRoot setting above.
  
  <Directory /var/www/html>
    AllowOverride All
  </Directory>

</VirtualHost>


Create SSL certs for all domains and configure redirects in the web server:

 sudo certbot --apache 

エラーなく証明書が取得できたというメッセージがでれば完了です。ブラウザーからアクセスして暗号化されていることも確認できました。

当然ですが、インスタンスのネットワーク設定時(参照)、 https ポートを開放している必要があります。

Wednesday, December 20, 2023

EC2 インスタンス起動メモ(無料枠利用)

 EC2 Dashboard から [Launch instance] をクリック:

Amazon Linux 2023 AMI を選択(Fedra ベースだそうです)。ちなみにAmazon Linux 2(ちょっと古い)は CentOS 7 ベース。


 インスタンスに名前をつけて:

t2.micro(無料枠内)を選択:

Created key pair.  PPK for PuTTY:

 https と http ポートを開放: 

Choose AMI profile as EC2_DefaultRole. 

No change for Termination protection. Other than above, everything is default.  “Launch instance”

作成中:

Successfully created:

Go back to EC2 Dashboard:

From left pane, choose “Elastic IPs”.  Choose (check box) the instance and “Allocate Elastic IP address”

Allocate

allocated successfully

Associated IP to the instance:

Select the instance and [Associate]:

Now the global IP is assigned to the instance!  To connect to the instance, [Connect] from EC2 dashboard:

Default user is "ec2-user".  [Connect]:

Congrats!  your server is ready to go!